How to take a Mac screenshot easily to capture anything
What is a screenshot?
A screenshot is the equivalent of taking a photograph of your screen to capture something you’d like to keep.
This can be a webpage with a great recipe you’d like to try, an error message after attempting to purchase something from an ecommerce website, a confirmation of a bank transaction and anything else you might want to keep a record of.
How to take a screenshot on your Mac?
There are 3 options you can use:
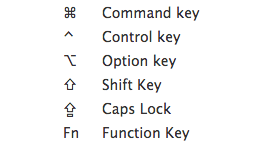
- Screenshot of the entire screen: Command-Shift-3
This will take everything on your screen “as is” - Screenshot of a specific area: Command-Shift-4
This will provide you with a target icon you can use to define a specific section of our screen you’d like to capture - Screenshot of an application window: Command-Shift-4-Space Bar
This will provide you with a camera-like icon and allow you to take a screenshot of any application window you’re hovering on. This is the best way to take a “clean” screenshot of a specific window and it even adds a drop shadow for you.
When you take screenshots on your Mac, they’ll be saved on the Desktop. As a suggestion to keep things tidy, I would move them right away to a location where you’d like to save them such as a folder in your documents or your iPhoto library.
Your turn! Do you have any other quick tip like this one? Do you have an example on how you use screenshots on your Mac? Share in the comments below, I’d love to hear your suggestions and ideas!


